Updated.
This morning I LOVED waking up to find "Pin This" as my friend's latest "Share" on Facebook. FINALLY a REAL mom! :
Pin This is a blog entry.
It's a real mom's compare/contrast with Pinterest to her reality. I've never seen her blog before, so I have no idea what the rest of the site features, but the above entry is pure gold.
In light of several conversations with friends lately, I recently posted this:
"Of my 246 pins on Pinterest I have now done 12. Honestly, that's 12 more than I thought I would do when I started pinning. Happy Pinning, Everyone!"
My girlfriend and I JUST talked about how Pinterest has produced a new version of the Barbie Doll Effect.
PINTEREST BARBIE!!: She not only has the perfect curves, but she dons a perfectly astonishing hair style complete with embellished bobby pins and homemade hairspray. Her apron is handcrafted, no sew from a Target tablecloth, and in her hand is a tray of homemade cupcakes with hand sculpted sugar doilies. Accessories include: two children in hand sewn outfits playing at a table made from crates and baskets, spray painted, labeled and organized. Also available: ingredients for children's homemade play dough and homemade colored rice. PRICE: Utter Exhaustion.
Now we're not only to have the perfect body and curves, we are now to have the picture-perfect home, stimulating crafts for our children, and dinner should belong in those glass displays meant to entice diners at restaurants.
Girls, just like with Barbie Dolls, we need to realize the truth: just as Barbie's curves are impossibly unhealthy so too is the standard we set for ourselves when we envy others lives through the lens of social media.
Can you imagine how much Barbie's SHOES cost - custom jobs required. Or her chiropractor, for that matter. With feet permanently molded for 6" heels, she's bound to have problems, not to mention her other, uh, notable features that HAVE to cause back and neck pain.
It's just not healthy to be that perfectly molded. With this added layer of crafty perfection, she's not only perfectly molded, but she's EXHAUSTED and BROKE.
As little girls we used Barbie as our measuring stick for beauty, and now we seem to use social media in much the same way. We need to keep in mind that there is a reality beyond the screen. Many of the pictures on Pinterest are probably snapped in the two minutes before the kids wake up from nap or come home from school. Or the photographer zeros in on the beautifully shaped cupcakes, cropping out the Disaster Area that was once the kitchen.
But let's not be too quick to judge. We're probably all at least a bit guilty of polishing our lives for the snapshots we offer the world. When we know someone is coming to see us, we put out our best stuff.
We run around and pick up the dirty socks, put the toys away, and take out the trash. We dust off the smiling family pictures on our mantle, and perhaps we throw together some freshly baked cookies or a meal for our guests.
And we will PRAY no one opens the closet, medicine cabinet, or goes into THE MASTER BATHROOM!!!! (though Pinterest probably has an idea for how we can take care of those trouble spots, wink wink).
Facebook is another way we let people look into a window of our lives, and we know they're dropping by, so we dressed it up a bit.
On Facebook Moms often have posts about their parenting adventures. My post might say something like:
"My boys are all playing quietly in their fort together! OH brotherly love. Bliss!"
But, just as there is a moment when our guests leave and life gets back to normal, there is always a status beyond the status, and a scene beyond the social media.
For example: my four boys played beautifully together for about 20 minutes the other morning. They pulled every single cushion, blanket, sheet, pillow, and stuffed animal into the den. They set up the card table over it and dubbed it their "Fort." YES I love their creativity and willingness to work together. But it was followed by two hours of frustrated effort to get it all cleaned up again. No perfection here!!
My simple status following that episode may have simply been, "I love chocolate."
Getting back to Pinterest, we need to remember that the pictures on Pinterest are not even from our own homes or real life, but rather they form a WISH list!
I take comfort in the fact that the pictures on Pinterest and the social media statuses of perfect parenting aren't all from ONE WOMAN or ALL IN ONE DAY. They are highlights from several women, showing that no one woman possesses utter perfection all at one time.
I remember the day I was introduced to a spiritual version of "Pinterest Pressure" in the Bible: Proverbs 31:10-31 - WOW. Talk about intimidation! It's overflowing with qualities a "wife of noble character" might possess.
It could be an overwhelmingly high bar for a girl, but a wise and wonderful friend (and mother of 6 children), told me, "First of all, this is an EXAMPLE of a woman. Secondly, she isn't all of those things all in one day. She possesses a collection of those qualities over a lifetime."
Proverbs 31 doesn't mention the flaws that she undoubtedly has. Instead it's a list of her positive features, her highlights over time. It's a polished snapshot of an ideal woman. Whew! THAT'S a relief! With that lens I can see a more realistic ideal woman.
Pintest Pressure and social media statuses of perfect parenting beg the reminder that no two women are exactly alike, and we are who we ARE, and not what we DO.
"Psalm 139:14 I praise you, for I am fearfully and wonderfully made. Wonderful are your works; my soul knows it very well."
So, Pinterest Barbie, with your handcrafted apron, perfectly styled hair, and hostess tray filled with homemade delights, you go ahead and be yourself. I might make an apron, and I might even use your recipe for sugar doilies. Some day. But not today. And probably not all at the same time. And maybe not at all. And I'm okay with that.
Tuesday, January 31, 2012
Sunday, January 22, 2012
Corn-Free Allergen-Friendly Lollipops

As a mother, I never imagined myself saying this: I want my kids to have candy.
The twins' birthday is THE a candy-loving holiday- Halloween! For their first two years, their birthday party has been a fun allergen-free family celebration with goodie bags full of inedible Halloween favors, but I have always wanted my boys to have candy. I searched and searched the Internet for a recipe that was safe for my guys. I initially thought about doing rock candy - you know, the science experiment in growing sugar crystals. But to do enough for a party would require a table full of mason jars for days while growing crystals with uncertain results. Ugh.
So I looked for other hard candies, but I kept finding recipes with corn starch, and my guys are allergic to corn (among a million other things). Whether the recipe called for cornstarch itself or powdered sugar, which contains cornstarch, every recipe had SOMEthing my guys couldn't have. UNTIL I saw a recipe for making your own powdered sugar using a coffee grinder and potato starch! I suddenly had renewed hope!
Powdered Sugar with Potato Starch (Note: this link also has other GREAT tips about corn-free cooking!) In case the link doesn't work, here's the recipe:
1 Tbsp Potato Starch (I don't know if tapioca starch would work, but would be worth an experiment if someone has a potato allergy)
1 cup Sugar
Grind in coffee grinder until no longer grainy. So easy!
WHERE TO BUY THIS STUFF: I buy my rice flours, potato starch, and tapioca starch at local health food stores, but I just discovered the very same brands for half the price on Amazon! Gotta' love that site. Some have had luck on Ebay, but I'm just not into it, espeicially with food products).

So now to make some lollipops.

Easy Homemade Lollipop Recipe:
2 cups sugar
2/3 cup water
1/8 teaspoon Cream of Tartar
Any desired flavoring (I used organic orange and lemon extracts, but I've since learned (with dark clouds gathering in my head) that many extracts often use alcohol derived from corn, which is why they can claim to be "gluten free." UGH! This may explain some eczema flares. But THANKFULLY! "The Chew" on ABC showed a lollipop recipe using a spoonful of frozen 100% juice concentrate (thawed) for flavoring. I've been to a couple of stores looking for a truly 100% juice that doesn't say "Natural Flavors" in the ingredient list, and they DO exist. I finally found a grape juice and a lemonade that we can use. I have not tried them yet, but will update when I have)
Appropriate vegetable coloring (I didn't use any coloring, and the juice idea has natural color with the juice)
INSTRUCTIONS:
Combine sugar and Cream of Tartar with the 2/3 cup water.

Stir until sugar is dissolved.

Boil until a temp of 290 F. is reached or until a drop of mixture will become hard when dropped into cold water. Remove from heat.

Add flavoring and coloring. Pour into greased pans or molds.
When partly cooled insert wooden sticks. (be sure to spin the sticks once they're in place to thoroughly surround them with lollipop syrup and secure them in the lollipop!) Chill in the fridge until they are completely cooled and hard. Store in an airtight container.
PROBLEM: I didn't own any molds, a candy thermometer, or sticks.
SOLUTION: I posted my dilemma on Facebook and my friends came through!
STICKS: A friend suggested I buy my lollipop sticks and thermometer at Michaels, similar to these Lollipop Sticks , Candy Thermometer.
MOLDS: My friends had three ideas for molds:
1. BUY A MOLD: Our Michaels didn't have molds for HARD candy (READ LABELS! They had LOTS for soft candy that were quite deceptive. This is how I found out the hard way that not all lollipop molds are created equal. Hard candy lollipop molds are a hard white plastic and will say they are meant for hard candy. I did a search for "hard candy molds" and bought mine from a small site I'd never heard of. Thankfully it worked out GREAT! And I have cute dinosaur molds.
RESULTS: I love our dinosaur molds, but the lollipops turned out VERY BIG and thick that the kids can't finish all at once! So my recommendation would be to find smaller molds for kiddos.

2. NO MOLD: to make wonky lollipops: Spray a cookie sheet with cooking spray and carefully spoon the hot lollipop syrup onto the sticks ( (I also sprinkled powdered sugar, but it clumped up on the oil, so ignore it in the picture below. Also, for oil cooking spray, I've found an olive oil cooking spray that has a hint of soy that works for us, but if you have a soy allergy, Pampered Chef at one time sold a pump spray bottle that lets you put your own oil inside, pump in air pressure, and spray. Awesome!).
RESULTS: When I did it this way, they turned out so thin that the lolli would fall off the pop almost as soon as the child took one lick. These are great with adults, but a bit awkward with kids.


3. MAKE A MOLD: Use a cookie sheet with sides (jelly roll pan), fill it with powdered sugar, use something to press shapes firmly into the sugar (I used a cap from a juice bottle, washed, of course), align your sticks into the shapes, and pour in the lollipop syrup.
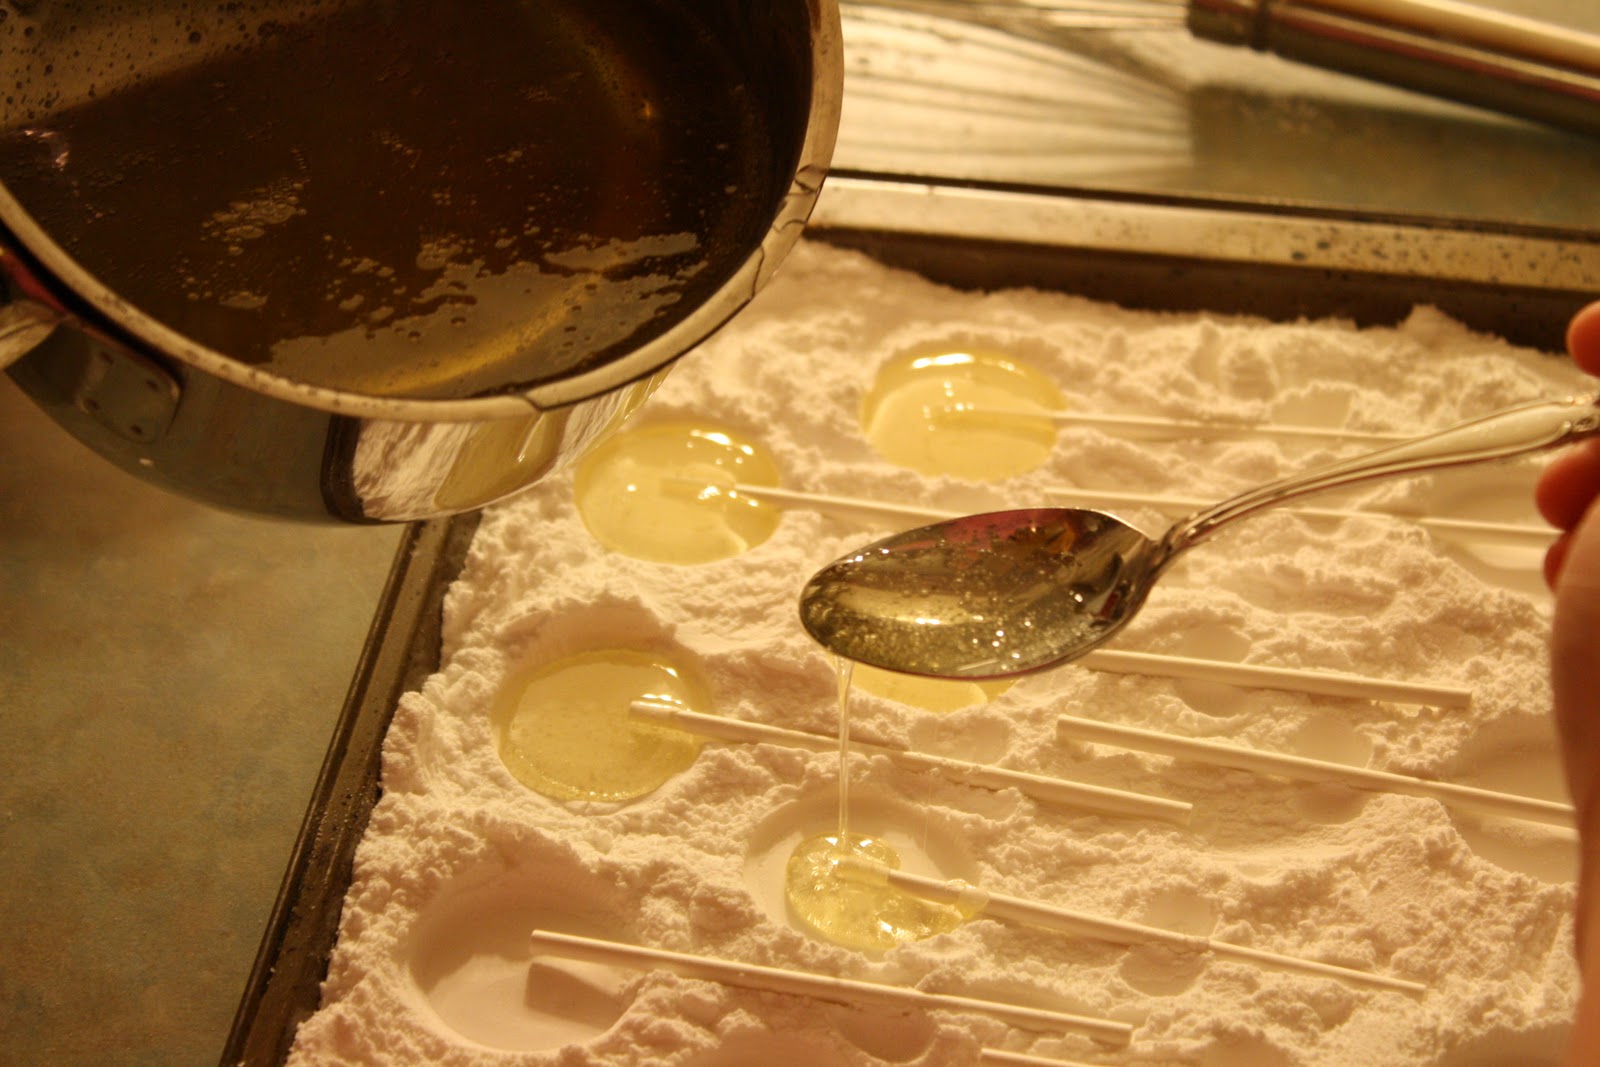 RESULTS: I have to say, in the end, this was my favorite method. Kind of messy, but in the end there was NO oil, and the added layer of powdered sugar added an element of froofroo to the pops. YUM!
Enjoy!

Tuesday, January 17, 2012
Paula Deen's House Seasoning, Basic BBQ, and Sweet Potato Fries

Years ago, before our very allergic twins were born,we had the "Food Network" for just a wonderful few weeks and I saw Ms. Paula Deen. A dazzling classic Southern lady who knew how to throw anything and everything into a pot and have it come out crowd-pleasingly wonderful. Pot-scraped-clean-every-time good.
But even with Ms. Paula's classic, easy-to-do recipes, I'd flop. So I abandoned my hopes of being the next Paula Deen. This mutt of a Minnesota girl turned South Carolina Gamecock just couldn't cook.
One take-away I have from my early experiments with Paula Deen, however, is her House Seasoning. It's so basic: salt, pepper, and garlic powder. I've had the recipe for years and years, but it wasn't until the twins were born with so many food allergies that I learned how multi-purpose this wonderful seasoning combination could be.
Here it is, Folks:
http://www.food.com/recipe/Paula-Deens-House-Seasoning-Mix-57340
- 1 cup kosher salt
- 1/4 cup fresh ground black pepper
- 1/4 cup garlic powder
Directions:
Mix ingredients together and store in an airtight container for up to 6 months.
That's it! So basic. I actually don't really mix it up and store it anymore. I just sprinkle salt, pepper, and garlic powder on whatever meat I'm cooking, but the concept is still fully alive and well. I AM SO THANKFUL THE TWINS AREN'T ALLERGIC TO GARLIC! I have a friend who said her little men are allergic to garlic. This might be true for others as well, and, always keeping in mind that my guys could develop a sensitivity to it, I've branched out to try other seasonings. It turns out that celery powder and onion powder are also delicious! And rosemary tastes wonderful on poultry, though I think it gives my guys runny noses (dark cloud).
Why did I feel inspired today to write about Mrs. Paula's lovely House Seasoning? Today I'm making BBQ. I have no idea how other households do it, but around here we have some guys who like the sauces, some who don't, and some who are allergic to them, so I don't use any sauces in my BBQ. This is NOT a heart-healthy meat. At All. But after a weekend of chicken tenders and squash soup, we're ready for some Southern food.
This recipe I can say I came up with on my own. And it's so so easy:
BASIC BBQ:

Big ole Boston Pork Butt (yes, I typed "Butt" and it's actually used on the package label)
and Paula Deen's House Seasoning
Put Butt in slow cooker. Sprinkle liberally with house seasoning. Cook on low for about 6-8 hours until it falls apart with a fork.
Don't be tempted to pull it out before it falls apart easily. Once done, put just the meat into a large dish, leaving behind loose fat and bone (I use my large roasting dish with a lid so the meat is easily stored in the fridge). Use paper towels to soak up extra fat from the meat. It will be dripping with it. Use a couple of forks to shred it. I taste it at this point and sometimes add some more House Seasoning. Serve over rice with a side of steamed vegetables, or plain with a side of roasted potatoes. My husband adds mustard-based BBQ sauce to his, another child adds soy sauce, and the rest of us eat it plain. Whatever works!

*My secret to rice: My guys don't like plain brown rice, so I mix white and brown rice together and store it in a container! No minute rice for us. I use a rice cooker and cook fully loaded whole grain rice. No rinsing so it retains nutrients.
Thank you, Ms. Paula Deen!
Bonus Recipe:
SWEET POTATO FRIES:

 Scrub 2-3 sweet potatoes, cut diagonally into coins, then slice each coin into strips like french fries. (UPDATE: per my friend's suggestion I now cut my fries in half again. The bite-sized pieces cook more evenly!) Line a cookie sheet with parchment paper. Place fries on the sheet in a single layer and sprinkle liberally with salt. Bake at 400 for about 20 mins, or until fork tender and slightly browning on the bottom. Might want to turn them over halfway through. Alternative seasonings: cinnamon, or sprinkle with brown sugar at the end. I used to baste the fries with olive oil first, but I've since discovered that we like them better without any oil.
 I always pile too many on the pan (pictured left) because my family eats them ALL. :) Soon I'll need to add a second tray!
Love,
G
Monday, January 16, 2012
Homemade Butternut Squash Soup with Homemade Chx Stock!!
Let me preface this post by saying that I don't like squash. At all. Here's my story of how I came to love this butternut squash soup recipe:
It was late at night. My husband was finishing a sermon for the next morning when I quietly approached him with a steaming teacup. I'd brought him soup. I'd stayed up to make this experimental soup because if it was a failure, I was going to have to find a plan 'B' for after church the next day. My husband (a guy who, if ever won the lottery, would simply grin with triangulated eyebrows and say, "Wow.") took one bite of my latest experiment and said, "Wow, this is awesome. I mean this is REALLY good. Can the twins have this?" I nodded. "Wow. Can I have some more?" *tear* After he tried it, I decided to brave a taste myself. I'd only had a small sip to taste for saltiness. I was SHOCKED. Even I, the squash-hater, loved it! SUCCESS!!! The next morning I discovered he had posted THIS on Facebook:
Gillian just brought me the best soup I have ever had. She made a butternut squash soup absolutely from scratch - from the chicken stock to roasted squash. INCREDIBLE!!!
He made my heart soar. I love that man.
In an earlier post I mentioned that I hate cookbooks, but I LOVE the Internet! Especially www.allrecipes.com . You can enter ingredients you want AND ingredients that you DON'T want. And it's HUGE. You can find pretty much anything. That's where found THIS squash soup recipe:
http://allrecipes.com/recipe/butternut-squash-soup-ii/detail.aspx
I also LOVE Facebook, or, more specifically, I love my friends and the extra connection FB gives us. My friends have been vital in this journey of cooking. This recipe calls for chicken stock, and not long ago chx stock was a "dark cloud" food. I'd checked many grocery store shelves and found NONE that I trusted for my guys. Through Facebook, I stumbled across a conversation with a friend who shared with me how to make chicken stock! I think she saw one of my posts about how I save the drippings from chx in ice cube trays and use them to flavor vegetables instead of butter? I don't know. But the end result of our connection through Facebook is that she told me how to make and store chicken stock!
CHX STOCK: after you've cooked a whole chicken or a lot of chicken pieces, strip off the meat, then throw the skin and bones into the slow cooker with 6-8 cups of water. Throw in a few carrots, a stock or two of celery, and an onion (just rough-cut the veggies since they're just for flavor and not for eating), season with salt, pepper, and garlic powder (just sprinkle an even layer of each on top) and cook on low overnight. Next morning, strain the stock into a bowl, throw out the veggies (so sad!) and let the stock cool in the fridge. Once cool, skim off the now-waxy layer of fat, then put in freezer containers! So easy.
The original soup recipe calls for dicing a raw butternut squash. If you've ever worked with butternut squash, you know what a pain in the rear it is to try cut when it's raw. So I read the comments under the soup and someone recommended roasting it first. When I was making baby food for the twins, one friend directed me to this site: http://wholesomebabyfood.momtastic.com/ . It has AWESOME instructions for basic peparation for a variety of foods - including butternut squash! Just look under "Vegetables."
However, just like with cookbooks, every recipe I find needs doctoring. Here is the orginal recipe with my alternatives in caps. ALL CREDIT GOES TO THE ORIGINAL SOURCE!! I just doctored it for our family:
Ingredients
SOOO YUMMY!
As with most of my experiments, there always has to be a downside - SOMEthing has to go wrong. I was HOPING this soup would have some leftovers, but alas it only made it through one meal for the six of us. Next time - double recipe.
Normally my experiments don't turn out, so I didn't take pictures. I guess if I'm going to blog about this adventure, I should start taking pictures and posting whether or not it works out. NEXT TIME!
It was late at night. My husband was finishing a sermon for the next morning when I quietly approached him with a steaming teacup. I'd brought him soup. I'd stayed up to make this experimental soup because if it was a failure, I was going to have to find a plan 'B' for after church the next day. My husband (a guy who, if ever won the lottery, would simply grin with triangulated eyebrows and say, "Wow.") took one bite of my latest experiment and said, "Wow, this is awesome. I mean this is REALLY good. Can the twins have this?" I nodded. "Wow. Can I have some more?" *tear* After he tried it, I decided to brave a taste myself. I'd only had a small sip to taste for saltiness. I was SHOCKED. Even I, the squash-hater, loved it! SUCCESS!!! The next morning I discovered he had posted THIS on Facebook:
Gillian just brought me the best soup I have ever had. She made a butternut squash soup absolutely from scratch - from the chicken stock to roasted squash. INCREDIBLE!!!
He made my heart soar. I love that man.
In an earlier post I mentioned that I hate cookbooks, but I LOVE the Internet! Especially www.allrecipes.com . You can enter ingredients you want AND ingredients that you DON'T want. And it's HUGE. You can find pretty much anything. That's where found THIS squash soup recipe:
http://allrecipes.com/recipe/butternut-squash-soup-ii/detail.aspx
I also LOVE Facebook, or, more specifically, I love my friends and the extra connection FB gives us. My friends have been vital in this journey of cooking. This recipe calls for chicken stock, and not long ago chx stock was a "dark cloud" food. I'd checked many grocery store shelves and found NONE that I trusted for my guys. Through Facebook, I stumbled across a conversation with a friend who shared with me how to make chicken stock! I think she saw one of my posts about how I save the drippings from chx in ice cube trays and use them to flavor vegetables instead of butter? I don't know. But the end result of our connection through Facebook is that she told me how to make and store chicken stock!
CHX STOCK: after you've cooked a whole chicken or a lot of chicken pieces, strip off the meat, then throw the skin and bones into the slow cooker with 6-8 cups of water. Throw in a few carrots, a stock or two of celery, and an onion (just rough-cut the veggies since they're just for flavor and not for eating), season with salt, pepper, and garlic powder (just sprinkle an even layer of each on top) and cook on low overnight. Next morning, strain the stock into a bowl, throw out the veggies (so sad!) and let the stock cool in the fridge. Once cool, skim off the now-waxy layer of fat, then put in freezer containers! So easy.
The original soup recipe calls for dicing a raw butternut squash. If you've ever worked with butternut squash, you know what a pain in the rear it is to try cut when it's raw. So I read the comments under the soup and someone recommended roasting it first. When I was making baby food for the twins, one friend directed me to this site: http://wholesomebabyfood.momtastic.com/ . It has AWESOME instructions for basic peparation for a variety of foods - including butternut squash! Just look under "Vegetables."
However, just like with cookbooks, every recipe I find needs doctoring. Here is the orginal recipe with my alternatives in caps. ALL CREDIT GOES TO THE ORIGINAL SOURCE!! I just doctored it for our family:
Ingredients
- 2 tablespoons butter (OLIVE OIL)
- 1 small onion, chopped
- 1 stalk celery, chopped
- 1 medium carrot, chopped
- 2 medium potatoes, cubed
- 1 medium butternut squash - peeled, seeded, and cubed
- 1 (32 fluid ounce) container chicken stock (I USED A 3 CUP CONTAINER OF HOMEMADE STOCK FROM MY FREEZER)
- salt and freshly ground black pepper to taste
Directions
FIRST START ROASTING THE BUTTERNUT SQUASH. CUT IT IN HALF LENGTH-WISE, THEN PUT IT FACE DOWN IN A BAKING PAN. ADD 1/2"-1" WATER TO THE PAN, AND ROAST OPEN-SIDE-DOWN IN THE PAN AT 400 FOR 40 MINS. THE SKIN WILL BE BUBBLED AND FORK-TENDER WHEN IT'S DONE. TO CUT OUT THE SQUASH, I MAKE A GRID OF SQUARES CUTTING TO JUST SHY OF THE SKIN, THEN SCOOP IT OUT. THE CHUNKS ARE ALREADY MADE! WHILE THE SQUASH ROASTS, PREPARE THE SOUP PER ALLRECIPE'S INSTRUCTIONS (my additions are in CAPS):- Melt the butter (HEAT OLIVE OIL) in a large pot, and cook the onion, celery, carrot, potatoes, and squash 5 minutes, or until lightly browned (THE BROWN BITS THAT STICK TO THE PAN ARE KEY TO THE FLAVOR OF THE SOUP). Pour in enough of the chicken stock to cover vegetables (I SLID MY MOSTLY STILL FROZEN STOCK INTO THE POT AND IT MELTED/THAWED QUICKLY). Bring to a boil. (ADD SQUASH WHEN ITS DONE!) Reduce heat to low, cover pot, and simmer 40 minutes, or until all vegetables are tender.
- Transfer the soup to a blender, and blend until smooth (I USED A CUISINART SMARTSTICK AND PUREED IT IN THE POT. BE CAREFUL!!! IT'S HOT HOT HOT). Return to pot, and mix in any remaining stock to attain desired consistency. Season with salt and pepper.
SOOO YUMMY!
As with most of my experiments, there always has to be a downside - SOMEthing has to go wrong. I was HOPING this soup would have some leftovers, but alas it only made it through one meal for the six of us. Next time - double recipe.
Normally my experiments don't turn out, so I didn't take pictures. I guess if I'm going to blog about this adventure, I should start taking pictures and posting whether or not it works out. NEXT TIME!
Friday, January 13, 2012
Going Totally Allergy Friendly
Our house is becoming almost totally milk and wheat free - FINALLY. Can you say, "CHALLENGING?!?!?!?" That's an exclamation, not a complaint. I'm happy to be getting healthier for our family, and also keeping the twins safe. But WOW. This is hard. VERY VERY HARD.
Out of six of us, we've known that two are allergic to milk, but we recently learned that two more of us are lactose intolerant. It makes sense for it to GO! Everything in moderation, though, or I'll go insane (not to mention BROKE buying alternatives). Elimination has been a slow process. Just last night I read the calendar wrong and I had to have our oldest at play practice half an hour earlier than I'd planned. UGH! Dinner plans ruined. I had enough prepared for the twins to have their food thrown into containers and eaten on the go, but I had to hit drive-thru for the rest of us. As my skills grow, and planning gets better, I'm hoping that I will have more on hand to throw together for all of us, not just the twins. If I learned to do it for two, I can learn to do it for six, right????
I'm learning. Always learning. And sometimes I get tired, frustrated, despondent, and scared. I once sat in the allergist's office alone with the twins. My husband tries very hard to get away from work for important doctor appointments, but this one he had to miss. I remember the doctor saying this wasn't the worst case he'd ever seen, but very close to it. He told me to keep doing what we were doing, and we'll reevaluate when they're five and take it from there. The twins weren't yet two, and we'd almost lost Z just a few months earlier. Tears came to my eyes as I asked, jokingly, but meaning it from the depth of my being, "How do we keep them alive till then?" He laughed a sympathetic laugh and said, "You're doing great, Mom. Keep it up." And then he sent us to a dietitian.
The dietitian was helpful in determining nutritional goals and proportions, and had some great food suggestions, but she had no clue the scope of the problem. She recommended a ton of foods and supplements that the twins had never tried before, and we'd just been told we couldn't introduce ANY more new foods until we visited the allergist again in a year. To use a term I read in Angela's Ashes, "dark clouds" formed in my head.
I hit the Internet hard to learn how to cook. I looked at recipes, not for their ingredients (the twins couldn't eat most of them), but to see the cooking instructions. Chicken: how to roast it. Seriously. I had no idea you could just throw chicken pieces in a baking pan for an hour. Sprinkle with salt and pepper, baste with their natural juices at the end, and voila! I learned Paula Deen's "House Seasoning." Google it for proportions, but I just now sprinkle a bit of each of the three ingredients: salt, pepper, and garlic powder. Now I even add onion powder. (I know from experience that if someone with food allergies read that, "dark clouds" gathered as they read "garlic" or "onions" or even "chicken." Ignore them and look for the things you or your child CAN have. It's okay. I've been there. I AM there.).
I hate cookbooks. I don't use the "H" word often, but it's applicable here. There is not any one cookbook, or just a recipe for that matter, that has everything I need. Everything requires substitutions, experiments, and new versions to suit our family's needs. I recently tried again. I had some time to kill in a bookstore while waiting for a son's event. I had the twins draped around my ankles and N standing with me, bored out of his head while I flipped through "Gluten-free" and "Dairy-free" cookbooks. None of them were free of all of the twins' allergens all at once, and (this is my ugliness showing) I was annoyed at how self-assured and perfect these women seemed because they'd figured out how to cook without just one or two allergens. Why I put myself through that "Dark Cloud" session again, I don't know. But I picked up my guys and moved on. Exhausted from looking at books, and feeling guilty for judging their authors.
THANKFULLY, now that I've finally learned to cook several things, feeding the twins really is not hard anymore. But it's boring. We eat every version of chicken, beef, rice, basic veggies and potatoes imaginable. My husband likes to say, "Welcome to how the rest of the world eats!" Who knew so many foods could taste so good on their own! (I'll be sure to post some of our family favorites). It just feels like we're eating the same things all the time. That's all.
I need to add that I am so very thankful that "Dark Cloud" moments are fewer and farther between these days, but they still happen. Last night's drive-thru incident, caused dark clouds to gather for a moment, but I'm much better at moving on. This whole "relearning everything I thought I knew" is hard for me. It might not be so hard for others who already know how to run a well-oiled household perfectly, but it's hard for ME. But I'm learning. And the Lord is so patient with me. And soon our home will be full of all wonderful and safe foods for all (hopefully...pray for us!)!
Love,
G
Early Survival - How Do I Feed My Babies????
In the beginning, the biggest challenge was this: I didn't really know how to cook before the twins came along. I knew the basics, like opening a can, boiling noodles, and assembling a casserole of some kind. And don't forget the cheese. Lots and lots of it. I never had to read a label or think too hard. Just open, heat, and serve. As I once heard Paula Deen say on a tv interview, "I didn't get this way by lookin' at the pictures!" We've come a long way, Baby!
My Grandma's stew saved my twins' lives. It's the only thing I knew how to make that had a full recipe without any substitutions. And in talking with a friend who makes her own baby food for her sons who also have allergies, I learned about the Cuisinart SmartStick. Meant for smoothies and the like, it makes a GREAT puree tool for in-the-pot puree.
POT ROAST/STEW RECIPE:
4 potatoes peeled and diced into 1 inch chunks
2-3 carrots cut into coins
Slab O' Meat: 1-3 lbs of any red meat more than an inch thick or stew meat. Be brave! Buy it and try it! (stew meat was too chewy for my guys to handle or to puree well when they were little).
Salt, pepper, garlic powder, onion powder shaken to taste over the meat (read labels to make sure there aren't any allergy warnings or added ingredients).
2 celery stocks cut into 1/4" wide U's (what is that, sliced?)
1 onion chopped
1 28oz can diced tomatoes (read the label for any extra ingredients or allergy warnings! I've picked up many o'can with milk and wheat warnings. UGH!)
1/2-1cup of water.
Put everything in the slow cooker in the order listed. Then cook on LOW for 6-8 hours, or on high for 3-4 hours, depending on how thick the meat is. I recommend LOW. It's done when it comes apart easily with a fork. I pureed it right in my slow cooker. I was very careful not to scratch it!!! It could also be done in a blender if you wait for it to cool and then do it in batches.
Serve alone, or over rice.
STORAGE: Refrigerator: Can be kept in the fridge for up to 3 days (I write the date in sharpie on the foil or plastic wrap covering the dish). Freezer: For babies I would put it into ice cube trays and cover the trays with foil, put the date and "Stew" on the foil, and freeze. If I needed the trays again, I'd dump the cubes into a freezer Ziploc bag and label the bag.
REHEATING FROZEN CUBES: To reheat, I'd microwave it in 30 second increments, stirring carefully to make sure the heat gets evenly distributed. BE CAREFUL! Don't overheat it for those babies, and mix it well so there aren't any hot spots!!
TRICKS: 4 fresh tomatoes work just as great as canned, especially from the summer farmer's market, but add more salt to compensate. You can add frozen veggies to the top if you don't have fresh ones to add to the bottom (carrots, peas, and green beans work best). And you can do the meat without the extra veggies or anything. Just top the meat with seasonings, tomatoes and water, and it will still turn out well, just with less flavor, or omit the tomatoes and baste with olive oil).
Enjoy!
Love,
G
Learning New Tricks
My Facebook post the other day was:
We made magic tonight. I mean, waffles. We made waffles and bacon tonight. Everyone ate the same adapted allergy-friendly recipe, and the same bacon that had no added "natural flavors." I can't tell you how nice it is that we are having more and more nights like this, when we all eat the same meal together because I'm finally learning how to cook allergy-foods in a way that all of us enjoy them! This is seriously answered prayer. God is so good.
As babies and early toddlers Z and S (our young twin sons) enjoyed their meals in high chairs. They often ate their "safe" meals as I was cooking "a regular" meal for the rest of us (Me, my husband, A, and N -our first two sons). I would make the twins' food in a big batch and reheat it. But I didn't like this routine. They were separate from the family table. Yes, it was easier to keep them safe this way, and as we learned how to keep them alive it was a necessary evil. Our ultimate goal, however, was to get them to the family table. This means no cheese, no butter, no bread, no eggs, and more.

Back in October 2011, before their third birthday, I am happy to report that they have joined the family table! Above is a picture of Z and S helping me take down their high chairs *tear*. Such a milestone!!
We're not fully allergen-free around here, but we're getting closer. And as a result our home is getting healthier!!!
Subscribe to:
Posts (Atom)